
Arduino Web Server LED Control project
DIY tutorial - Arduino remote control LED via a web server

WEB development is one of the most progressing fields in Software engineering. Top high tech companies, such as Intel and Cisco, are developing IoT (Internet of Things) technology that will shape the 21st century to an echo system of internet controlled devices. The use of WEB development is to create an interface which could be accessed via any smart device in a LAN (Local Area Network) – a Webpage. From there, a control interface is presented and communicates with an electronics device to power up end devices, providing full control of them over the network.
What will we learn
In the Arduino web server LED control project we will use an Arduino and an Ethernet shield and we will create a small http web server ,like a website, on our LAN which will control an RGB LED with an interactive web interface. The Website will also be password protected, since cyber security is crucial in the world of control over Network This small but a bit complicated project will be your key entering the world of IoT, WEB development and Networking. From there the possibilities are endless!


Programming languages used in this project:
- C (Arduino compatible)
- HTML
- CSS
- JavaScript
Hardware
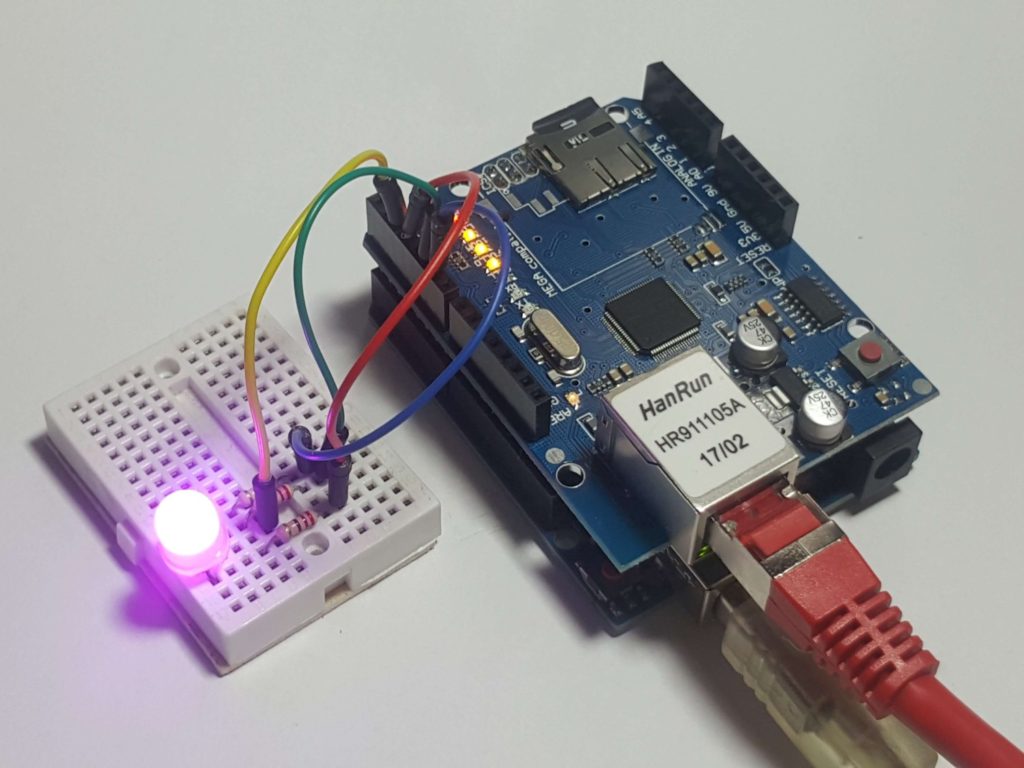
In terms of hardware the projects is not very complicated. There is no need for previous electronics experience as far as I’m concerned. The Ethernet shield is applied pin to pin directly on the UNO board. Assemble the LED on the breadboard, it has 4 pins. Let’s call them 1, 2, 3, 4.

Put 3 220 Ohm resistors in series with pins 1, 3 and 4. Connect pint 1 (Red) of the LED to pin 3 on the Shield through the resistor, pin 2 (Vcc) to 2 directly pin 3 (Green) to pin 5 through a resistor and pin 4 (Blue) to pin 6 through a resistor. See schematic below for clearer understanding:
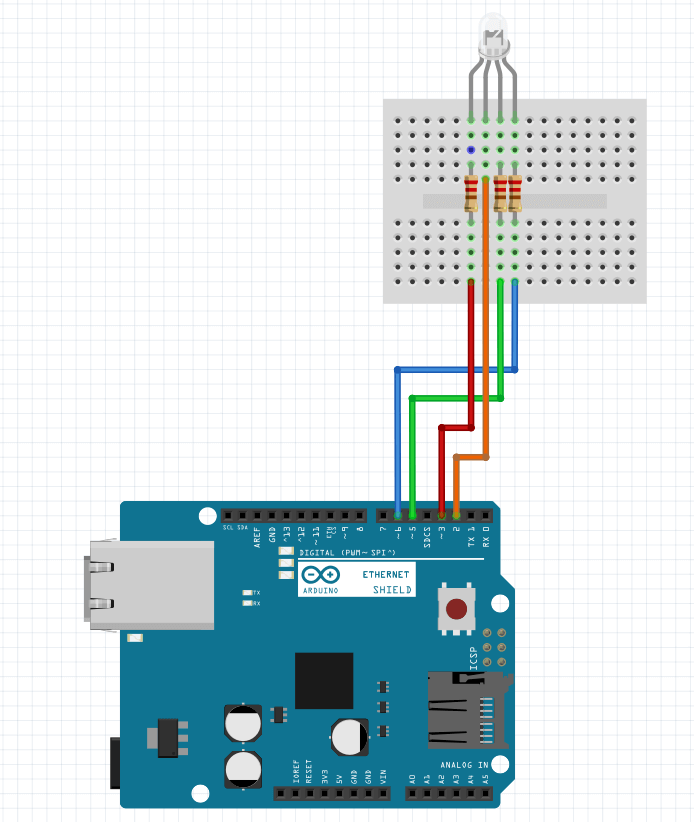
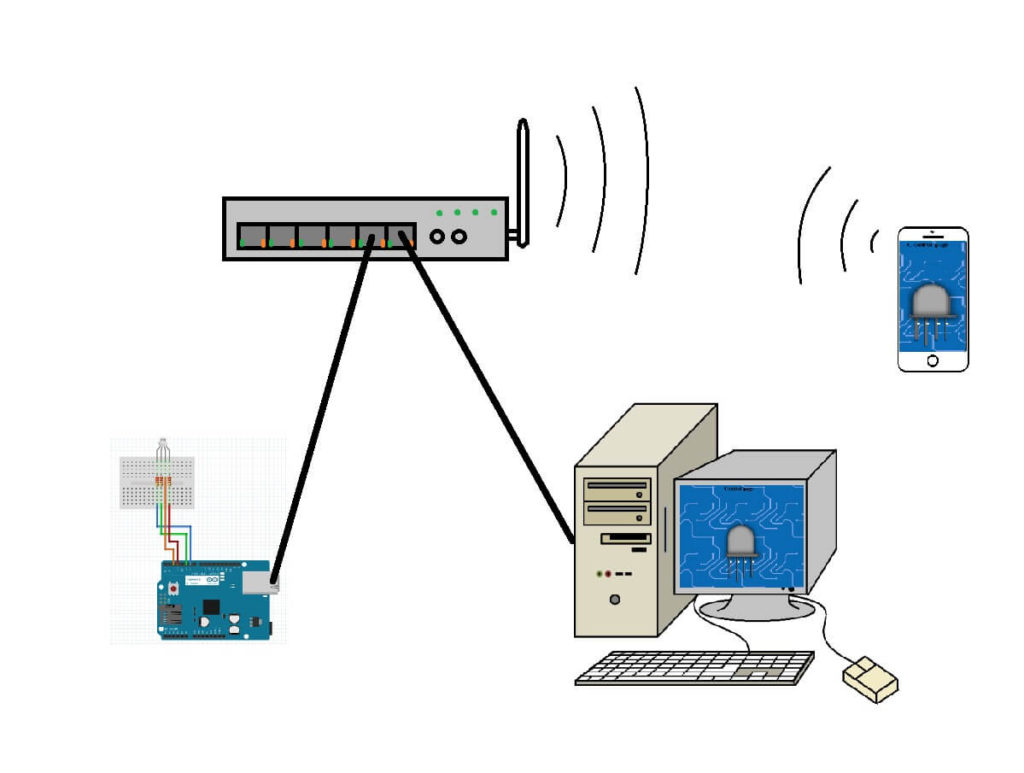
Since the LED in my case is a Common Collector we would need to apply ground to the pins to turn on colors.Now, to operate we will need to program a web server on the Arduino and we need to connect it to the network using a Modem or a Router. I used a TP-Link TL-WR841N Router which supports Ethernet connection and Wireless. For which the default IP is 192.168.0.1 and the login details are User: admin Password: admin. So we will connect an Ethernet cable to the Shield’s Ethernet port and pug it to the Router. We may use a Second cable to connect to a PC or use the wireless interface.

Software
Most of this project and its added value is the software and is the bigger challenge, as it is in the industry of WEB development. We will go through the full design and development of the web pages and the server and the benefits of the use of various programming languages C, JavaScript, HTML and CSS which developers use in the industry. I’m going to assume that you are somewhat familiar with the programming languages we are going to use and know the basics.
Arduino
An Arduino is a microcontroller based development board which is programmable using the ArduinoIDE. The IDE allows us to write code in C and to compile it and upload it on to the controller’s internal flash memory. Then the processor of the chip reads through the commands and executes them. We need to turn this in to a Server which will host connecting clients, handle requests and upload the site’s hyper text to the user’s browser to display. To do so we must transmit the code on HTTP protocol to the client’s address. The shield will handle that but we will have to pass it to the shield as plain text. We can use the println() function to transmit the entire code of the site, however this is very much memory consuming so we prefer to minimize the use of that and store the web code in files instead. Fortunately the Ethernet shield we are using supports an SD card slot and we can store the files on it and load them from there when needed.
Programming the website files
Okay, so we will start programming the files that will be stored on the SD card which will be all the web pages. Each page’s code will be a different file ending with .htm extension as for html. In addition, there will be a CSS file where we’ll design all the graphics of the site including the flashing RGB LED. We can edit them in any text editing program e.g. notepad++. We do not need to program and activate the Arduino to transmit the pages yet, we may rather open them and run them directly on the browser.
The file we will have are:
login. htm – Login page
main.htm – Menu page
control.htm – LED control page UI
404.htm – Page not found error if the user typed something wrong in the URL
401.htm – Unauthorized page if the authentication failed
style.css – Graphical design of the pages
elec.jpg – A background image for the control page
login.htm

Let’s start with the login page. So let’s open up our editor of choice and write:
<!DOCTYPE HTML>
<html>
	<head>
	</head>
	<body>
	</body>
</html>
Between the <head></head> tags we’ll write the title, link the CSS file:
<title>Login</title>
<link rel="stylesheet" href="style.css"/>
Also we shall define the login function and time function in Javascript. So we open <Script></Script> tags and write:
<Script>
	function login()
	{
	const user = document.querySelector('#user')
	const pass = document.querySelector('#pass')
	const self = event.target
	self.disabled = true;
	fetch(`user=${user.value}&pass=${pass.value}`).then(r => {
		if (r.status == 200) {
			window.location = 'main.htm'
		} else {
			pass.value = ''
		}
		self.disabled = false;
	}).catch(e => {
		self.disabled = false;
	})
	}

	function timeFunction()
	{
		var now = new Date();
		return now.toLocaleString();
	}
	setInterval("timeFunction()", 1000);
	var displayTime = timeFunction();
</Script>
This function, when called, will take data written in the “#user” and “#pass” fields and send it to the server as HTTP request. For instance, if we write “user” “1234” the request will be a string:
“user=user&pass=1234”
timeFunction() requests and returns the local time of the system.
Now, between the <body></body > tags lets first add an h3 header that will display the login time and execute a script that will call the time function within a single line:
<h3>Time: <script>document.write(timeFunction());</script></h3>
Next, we shall make a class and a form class for the login box where there will be two fields; user and password. And the type of text for the password field will be defined as “password” to censor its characters and an id should be given so that the login() function could address them:
<body>
    <h3>Time: <script>document.write(timeFunction());</script></h3>

    <div class="login">
    <form class="loginForm">
    	Username: <input type="text" id="user"/><br/>
    	Password: <input type="password" id="pass"/><br/>
    	<button onclick="login()">Login</button>
    </form>
    </div>
</body>
The page design in style.css will be tagged “.login”. it would be identified by <div class=”login”> and the browser will use the code to layout the page.
.login
{
	position: absolute;
	top: calc(50% - 35px);
	left: calc(50% - 125px);
	border: 1px solid white;
	width: 250px;
	height: 80px;
	padding: 10px;
}
Main.htm
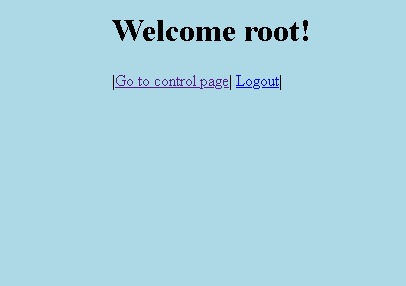
If the authentication went successful then we want to load the menu page. We will make this process automatic in the Arduino later. For now, let’s assume that the login button requests main.htm.
There will be just be two options for this project: continue to control page or logout. However this page may potentially be used to contain access to plenty other pages or data bases were this website a bit bigger. So the code is short:
<!DOCTYPE HTML>
<html>
<head>
<title>Main page</title>
<link rel="stylesheet" href="style.css"/>
</head>
<body>
<div id="welcome">
<h1>Welcome root!</h1>
|<a href="control.htm">Go to control page</a>|
<a href="login.htm">Logout</a>|
<div>
</body>
</html>
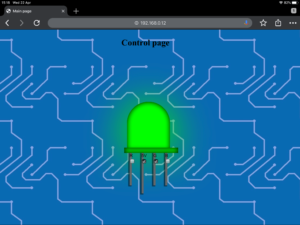
Control.htm
Control.htm will be the page used to control the colors of the LED.

We shall start by creating the LED figure in style.css

First let’s make a welcome id where we’ll position everything relative to the center of the screen. That way the figure will stay centered on different screen sizes and even if the user will change the size of the window.
#welcome
{
	position: absolute;
	left: calc(45% - 50px);
}
Now lets do a LED class style which will contain all of the figure’s elements:
.LED
{
  position:absolute;
  width:230px;
  height:400px;
  top:250px;
  left:0px;
}
Next we shall build the figure using simpler shapes; mainly rectangles. The head of the LED is a square with two rounded edges so we will round them with border –radius. To make a nice shadow effect I used box-shadow: inset 0 0 20px rgba(0,0,0,1), 0 0 30px 0 rgba(0,0,0,1); The base is a rectangle with similar parameters except of the dimensions and corners. The legs are rectangles with different box-shadow parameters. The code is below:
.sqr
{
  box-shadow: inset 0 0 20px rgba(0,0,0,1),
                  0 0 30px 0 rgba(0,0,0,1);
  position:absolute;
  background-color:darkgrey;
  width:160px;
  height:180px;
  border-top-left-radius:80px;
  border-top-right-radius:80px;
  top:10px;
  left:20px;
}
.rctngl
{
  box-shadow: inset 0 0 20px rgba(0,0,0,1),
                  0 0 30px 0 rgba(0,0,0,1);
  position:absolute;
  background-color:darkgrey;
  width:200px;
  height:20px;
  top:180px;
  left:10px;
}
.leagR
{
  font-family:arial;
  position:absolute;
  background-color:#666666;
  box-shadow: -3px 2px 2px 2px rgba(0,0,0,0.5);
  width:8px;
  height:120px;
  top:200px;
  left:162px;
}

.leagG
{
  font-family:arial;
  position:absolute;
  background-color:#666666;
  box-shadow: -3px 2px 2px 2px rgba(0,0,0,0.5);
  width:8px;
  height:120px;
  top:200px;
  left:118px;
}

.leag5
{
  font-family:arial;
  position:absolute;
  background-color:#666666;
  box-shadow: -3px 2px 2px 2px rgba(0,0,0,0.5);
  width:8px;
  height:150px;
  top:200px;
  left:74px;
}

.leagB
{
  font-family:arial;
  position:absolute;
  background-color:#666666;
  box-shadow: -3px 2px 2px 2px rgba(0,0,0,0.5);
  width:8px;
  height:120px;
  top:200px;
  left:30px;
}
Alright, now let’s write the html code starting with the header:
<!DOCTYPE HTML>
<html>
<head>
	<title>Main page</title>
	<link rel="stylesheet" href="style.css"/>
	<style>
		body
		{
			background-image: url("elec.jpg");
		}
	</style>
<script>
</script>
</head>
In the <script></script> tags we need to write function that sends the input to the Arduino. But first let’s finish the body in which we’ll display the LED figure with check boxes on the legs:
<body>
<div id="welcome">
	<h1>Control page</h1>
<div>
<div class="LED">
  <div class="sqr"></div>
  <div class="rctngl"></div>
  <div class="leagR">B<input type="checkbox" name= "Bin" onClick="clickFunc()"></div>
  <div class="leagG">G<input type="checkbox" name= "Gin" onClick="clickFunc()"></div>
  <div class="leag5">5V<input type="checkbox" name= "Vin" onClick="clickFunc()"></div>
  <div class="leagB">R<input type="checkbox" name= "Rin" onClick="clickFunc()"></div>
</div>
</body>
The line onClick=”clickFunc()” will call the clickFunc() function we are about to define between the script tags. This function calls the function inputHandle() which collects data from the checkboxes with document.getElementsByName(“name”)[0].checked command and outputs the RGB color code for the LED using rgb(). Also this function will store a coded value in a global variable var output that will later be transmitted to the server to activate the necessary pins.
Next, the function ledColor() is called to paint the LED in the interface according to inputHandle() using document.getElementsByClassName(“sqr”)[0].style.
Finally, we want to send a request to the server to update outputs in the physical world. So upon click we shall execute function httpGet() which will send the request in a form of: “click?=0101x”. Where the number 0101 is in binary and every digit represents an output pin, which in this case will turn the LED in purple.
Full JavaScript code is as follows:
<script>
  var output = 14; //1110  (rgbv) initiate when all is off.
  function httpGet(theUrl)
	{
		var xmlHttp = new XMLHttpRequest();
		xmlHttp.open( "GET", theUrl, false ); // false for synchronous request
		xmlHttp.send( null );
		return xmlHttp.responseText;
	}
  function rgb(r, g, b)
  {
	return "rgb("+r+","+g+","+b+")";
  }
  function inputHandle()
  {
	var valueR = 0;
	var valueG = 0;
	var valueB = 0;
	output = 14; //1110
	if(document.getElementsByName("Vin")[0].checked)
	{
	  output += 1;
	  if(document.getElementsByName("Rin")[0].checked)
	  {
	    output -= 8;
	    valueR = 255;
	  }
	  if(document.getElementsByName("Gin")[0].checked)
	  {
	    output -= 4;
	    valueG = 255;
	  }
	  if(document.getElementsByName("Bin")[0].checked)
	  {
	    output -= 2;
	    valueB = 255;
	  }
	  if(valueR || valueG || valueB)
		return rgb(valueR, valueG, valueB);
	  else return "darkgrey";
	}
	else return "darkgrey";
  }
  function ledColor(color)
  {
	var shade;
	if(color == "darkgrey")
		shade = "inset 0 0 20px rgba(0,0,0,1), 0 0 30px 0 rgba(0,0,0,1)";
	else
	{
		shade = "inset 0 0 20px rgba(0,0,0,1), 0 0 150px 0 ";
		shade = shade.concat(color);
	}
	document.getElementsByClassName("sqr")[0].style.backgroundColor = color;
	document.getElementsByClassName("sqr")[0].style.boxShadow = shade;
	document.getElementsByClassName("rctngl")[0].style.backgroundColor = color;
	document.getElementsByClassName("rctngl")[0].style.boxShadow = shade;
  }
  function clickFunc()
  {
	ledColor(inputHandle());
	httpGet("click?=" + output.toString() + "x");
	  }
</script>
Error handler
Every web server needs to know to handle errors. Here we’re expected to handle two types of errors:
- 401 – Authentication fail, or wrong password in other words.
- 404 – Page not found. May occur if the user entered something in the URL.
We will make a file to handle each:
401.htm
<!DOCTYPE HTML>
<head><title>401 Error</title></head>
<body><style>body{background-color: lightblue;}</style>
<h1>401: Authentication error.<br/>Are you authorized!?</h1>
</body>

404.htm

And that concludes our Website design.
save all of the files on the SD card and insert it into the ethernet shield.
Server
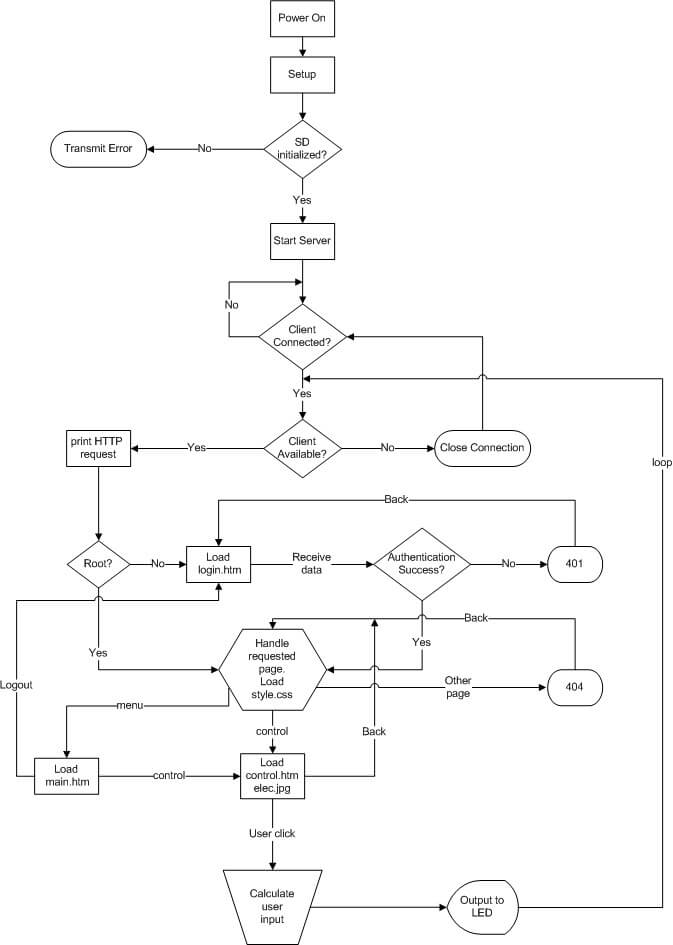
We will program the Arduino to serve as a webserver that will host the website that we have programmed and saved on the SD card which is inserted into the ethernet shield. the Arduino should run the following algorithm:
The Arduino LED control board will communicate with the Ethernet shield via SPI. In the ArduinoIDE we will load the necessary libraries to handle all the hardware:
#include <SPI.h>
#include <Ethernet.h>
#include <SD.h>
At this stage we will set a PORT an IP and a MAC address. For this project we will set a static IP which will work with our gateway 192.168.0.1 on port 80.
byte mac[] = { 0xDE, 0xAD, 0xBE, 0xEF, 0xFE, 0xED };
#define IP IPAddress(192,168,0,12);
EthernetServer server(80);
In the setup we should initialize the SD card with function SD.begin() and it should return TRUE. To start the server we use Ethernet.begin() with our IP and MAC of choice and then enter the loop.
In the loop, we shall await until a connection request it received. If so, we must check that he sends appropriate HTTP packets and the load the suited request page or action, whether it’s a login request page or LED output update. So I instructed the Arduino to
The authentication details for this server will be:
User: “root”
Password: “1234”
If client pressed the login button then the server shall expect the following HTTP request: “user=root&pass=1234”. Otherwise the server will respond with 401.
It is important for the server to respond to each and every request with the appropriate response code. Remember to send a 200 when the request is accepted, as well as the type of content we are to load; HTML, CSS etc.
With that said, here is the full code for the Arduino LED control server with detailed comments:
//Arduino WebPage circuit control 2018
//Author: Dirty Dail

#include <SPI.h>
#include <Ethernet.h>
#include <SD.h>

#define REQ_BUF_SZ 40 // size of buffer used to capture HTTP requests

byte mac[] = { 0xDE, 0xAD, 0xBE, 0xEF, 0xFE, 0xED };
#define IP IPAddress(192,168,0,12)

EthernetServer server(80);       // create a server at port 80
File webFile;                    // handle to files on SD card
char HTTP_req[REQ_BUF_SZ] = {0}; // buffered HTTP request stored as null terminated string
byte req_index = 0;              // index into HTTP_req buffer
bool root = false;               // login indicator

//RGB LED Pins
#define RED 3
#define GREEN 5
#define BLUE 6
#define PWR 2

//Analog Sensor measure
#define SENSOR A0

//---------------------------------------------<functions>-------------------------------------------------------------------

// sets every element of str to 0 (clears array)
void StrClear(char *str, char len)
{
    for (int i = 0; i < len; i++)
        str[i] = 0;
}

// searches for the string sfind in the string str
// returns 1 if string found
// returns 0 if string not found
byte StrContains(char *str, char *sfind)
{
    //byte len = strlen(str);
    #define LEN strlen(str)
    byte found = 0;
    byte index = 0;

    if (strlen(sfind) > LEN) return 0;
    while (index < LEN)
    {
        if (str[index] == sfind[found])
        {
            found++;
            if (strlen(sfind) == found) return index;
        }
        else found = 0;
        index++;
    }
    return 0;
}

void controlHandler(byte output) // byte = 00001111 (0000rgbv)
{
    digitalWrite(PWR, output%2);
    digitalWrite(BLUE, (output/2)%2);
    digitalWrite(GREEN, (output/4)%2);
    digitalWrite(RED, (output/8)%2);
}
//-----------------------------------------</functions>-------------------------------------------------------------------

void setup()
{
    //Outputs
    pinMode(RED, OUTPUT);
    pinMode(GREEN, OUTPUT);
    pinMode(BLUE, OUTPUT);
    pinMode(PWR, OUTPUT);
    digitalWrite(PWR, LOW);
    digitalWrite(RED, HIGH);
    digitalWrite(GREEN, HIGH);
    digitalWrite(BLUE, HIGH);

    Serial.begin(9600);       // for debugging
    // initialize SD card
    Serial.println("Initializing SD card...");
    if (!SD.begin(4))         // 4 - SS pin
    {
        Serial.println("ERROR - SD card initialization failed!");
        return;               // init failed
    }
    Serial.println("SUCCESS - SD card initialized.");
    Ethernet.begin(mac, IP);  // initialize Ethernet device => Ethernet.begin(mac, ip);
    server.begin();           // start to listen for clients
}

void loop()
{
    EthernetClient client = server.available();  // try to get client

    if (client) // got client?
    {
        bool currentLineIsBlank = true;
        while (client.connected())
        {
            if (client.available()) // client data available to read
            {
                char c = client.read(); // read 1 byte (character) from client
                // buffer first part of HTTP request in HTTP_req array (string)
                // leave last element in array as 0 to null terminate string (REQ_BUF_SZ - 1)
                if (req_index < (REQ_BUF_SZ - 1))
                {
                    HTTP_req[req_index] = c;          // save HTTP request character
                    req_index++;
                }
                Serial.print(c);    // print HTTP request character to serial monitor
                // last line of client request is blank and ends with \n
                // respond to client only after last line received
                if (c == '\n' && currentLineIsBlank)
                {
                    if(root) // client authorized?
                    {
                      if(StrContains(HTTP_req, "GET / ") || StrContains(HTTP_req, "GET /login.htm"))
                      {
                          root = false;
                          client.println("HTTP/1.1 200 OK");
                          client.println("Content-Type: text/html");
                          client.println("Connnection: close");
                          client.println();
                          webFile = SD.open("login.htm");
                      }
                      else if(StrContains(HTTP_req, "control.htm"))
                      {
                          root = true;
                          client.println("HTTP/1.1 200 OK");
                          client.println("Content-Type: text/html");
                          client.println("Connnection: close");
                          client.println();
                          webFile = SD.open("control.htm");
                      }
                      else if(StrContains(HTTP_req, "main.htm"))
                      {
                          root = true;
                          client.println("HTTP/1.1 200 OK");
                          client.println("Content-Type: text/html");
                          client.println("Connnection: close");
                          client.println();
                          webFile = SD.open("main.htm");
                      }
                      else if (StrContains(HTTP_req, "elec.jpg"))
                      {
                          client.println("HTTP/1.1 200 OK");
                          client.println();
                          webFile = SD.open("elec.jpg");
                      }
                      else if (StrContains(HTTP_req, "style.css"))
                      {
                          client.println("HTTP/1.1 200 OK");
                          client.println("Content-Type: text/css");
                          client.println("Connnection: close");
                          client.println();
                          webFile = SD.open("style.css");
                      }
                      else if (StrContains(HTTP_req, "click?"))
                      {
                          client.println("HTTP/1.1 200 OK");
                          client.println();
                          byte i = StrContains(HTTP_req, "click?") + 2;
                          byte result = 0;
                          byte dig = 0;
                          for(i; HTTP_req[i] != 'x'; i++)
                          {
                            dig++;
                            if(dig >= 2) result *= 10;       //if dig >= 2 then move the digits left e.g. 24 => 240
                            result += (HTTP_req[i] - '0');
                          }
                          controlHandler(result);
                      }
                      else
                      {
                          client.println("HTTP/4.5 404 Not Found");
                          client.println("Content-Type: text/html");
                          client.println("Connnection: close");
                          client.println();
                          webFile = SD.open("404.htm");
                      }
                    }
                    else
                    {
                      // go to login page if client is noth authorized.
                      if(StrContains(HTTP_req, "GET / ") || StrContains(HTTP_req, "GET /login.htm"))
                      {
                          client.println("HTTP/1.1 200 OK");
                          client.println("Content-Type: text/html");
                          client.println("Connnection: close");
                          client.println();
                          webFile = SD.open("login.htm");
                      }
                      // This is a login event. Login if the user and password details entered are "root" and "1234", else 401.
                      else if(StrContains(HTTP_req, "user=root&pass=1234"))
                      {
                          root = true;
                          client.println("HTTP/1.1 200 OK");
                          client.println("Content-Type: text/html");
                          client.println("Connnection: close");
                          client.println();
                          webFile = SD.open("main.htm");
                      }
                      else if (StrContains(HTTP_req, "style.css"))
                      {
                          client.println("HTTP/1.1 200 OK");
                          client.println("Content-Type: text/css");
                          client.println("Connnection: close");
                          client.println();
                          webFile = SD.open("style.css");
                      }
                      else
                      {
                          client.println("HTTP/4.2 401 Unauthorized");
                          client.println("Content-Type: text/html");
                          client.println("Connnection: close");
                          client.println();
                          webFile = SD.open("401.htm");
                      }
                    }
                    // If a request to open a page was received then webfile should be loaded.
                   if (webFile)
                   {
                        while(webFile.available())
                        {
                            client.write(webFile.read()); // send web page to client
                        }
                        webFile.close();
                    }
                    // reset buffer index and all buffer elements to 0
                    req_index = 0;
                    StrClear(HTTP_req, REQ_BUF_SZ);
                    break;
                }
                // every line of text received from the client ends with \r\n
                if (c == '\n')
                {
                    // last character on line of received text
                    // starting new line with next character read
                    currentLineIsBlank = true;
                }
                else if (c != '\r')
                {
                    // a text character was received from client
                    currentLineIsBlank = false;
                }
            } // end if (client.available())
        } // end while (client.connected())
        delay(1);      // give the web browser time to receive the data
        client.stop(); // close the connection
    } // end if (client)
}
Running the server and logging to the website
The project is ready. To connect to the server power up the Arduino using a USB or a DC power jack. Once powered on the server should be up immediately and its IP is 192.168.0.12. To connect to the website we must establish a local area network. Use a modem or router and configure its IP to 192.168.0.1 Subnet Mask:255.255.255.0. Use an Ethernet cable to connect the ethernet shield to the router. Connect a PC to another port of the router or enable WIFI on the router and use any device to connect to it. Now that we are connected to the same network, simply open a web browser on your device and in the URL enter “http://192.168.0.12” which is the IP of the server on the HTTP protocol. The login page should now appear on the screen.
Summary
After this project we now learned how to create a website and a webserver on an Arduino. We now know the basics of web development and the IoT. This project and all of its software are but an example to the technological potential of web development. From here onward you have the basics to develop and exploit this example to an ever more useful and advanced projects
Thank you
We thank you for learning and hopefully completing our project. We are looking forward to hear from you in the comment section. Questions and constractive critisizm is welcome.
We would like to know what you think about our Arduino web server LED control project.
Please comment if you have any questions about the project!